This article describes how to set up the Jobcluster applicant management system from scratch in just a few steps and how to manage an initial application in the system.
The quick start includes the following steps:
- Create an application form
- Create an application process and add an action
- Link a job advertisement from the One-Click-Recruiter with the applicant management system
- Create an initial “manual” application for the job advertisement
Let’s go:
Log in to the applicant management system with your user name and password.
Create an application form #
To be able to manage applications in the applicant management system, you must first create an application form or optionally edit the existing standard application form. This form is used to request information from applicants and to create a data record in applicant management.
- Click on Application forms in the left navigation bar
- Click on the green Add button on the right-hand side
- Enter a name for the form in the Name field. E.g. “Specialist application”.
- (Optional) Describe the form. E.g. “First name, last name, e-mail, driver’s license class and earliest possible start date are requested”
- Click on the green Save button
The new form is now displayed in the list of application forms:
To configure the application form, click on the “Configure” gearwheel button. This opens the drag & drop builder of the application form. As an optional step, individual fields can be added to the application form below. You can also choose from a set of predefined fields, which you will find on the right-hand side.
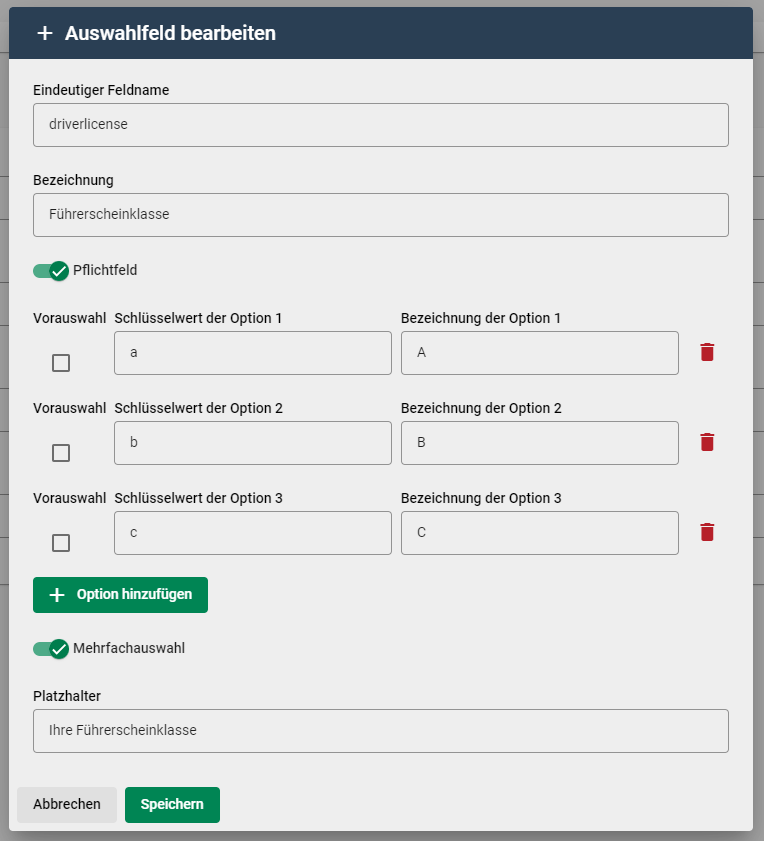
Optional: Add a “Driver’s license class” field:
- Unfold the menu item “New fields” on the right-hand side.
- Use the mouse (click & hold) to drag a selection field into the area of the form, e.g. below “Surname” and release the field.
- Click on the “Field options” gear icon on the field and on Edit.
- Give the field a unique name, e.g. driverlicense
- Give the field a name. This will be visible in the form, e.g. Driving license class
- Select the Optional field option to make the field a mandatory field.
- Enter three selection options:
- Key value 1: a, designation 1: A
- Key value 2: b, designation 2: B
- Key value 3: c, designation 3: C
- Optionally create further values via “Add option”.
- Do not change the “Only one selection value” button
- Give the field a placeholder, e.g. “Your driver’s license class”
- Click on Save
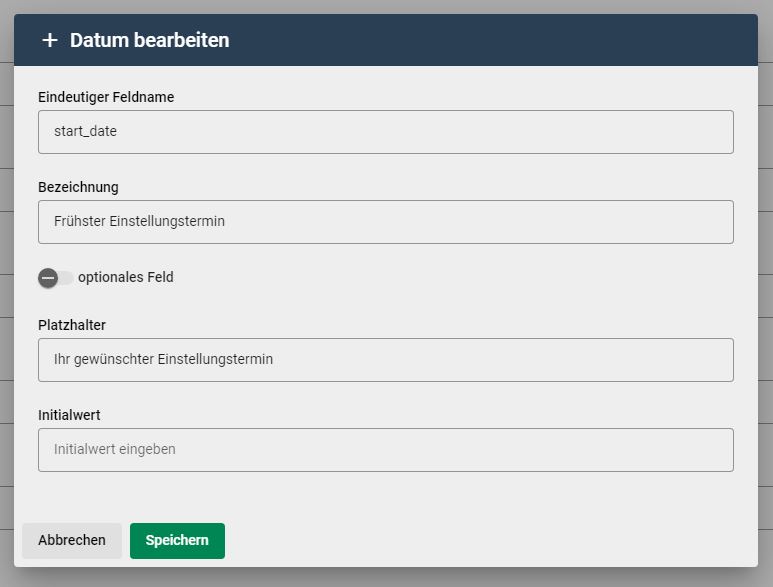
Optional: Add a field “Earliest hiring date”:
- Unfold the menu item “New fields” on the right-hand side.
- Use the mouse (click & hold) to drag a date into the desired area of the form and release the field.
- Click on the “Field options” gear icon on the field and on Edit.
- Give the field a unique name start_date
- Give the field a name. This will be visible on the form, e.g. Earliest hiring date
- Give the field a placeholder, e.g. Your desired date of employment
- Click on Save
Important: Once you have created all the required fields and defined the order of the fields, click on the green “Save” button at the top left to save all changes to the application form.
Create an application process and add an action #
Application processes define a sequence of steps (also called statuses) that are carried out when you manage applications. Each status can be provided with automatic actions which, for example Send e-mails or automate other activities. In the following you define an application process “Specialist application”, which is linked to the created application form “Specialist application”.
- Click on Process generator in the left-hand navigation bar
- Click on the green Add button on the right-hand side
- Enter a name for the process in the Name field, e.g. Specialist application
- Select the application form associated with the process, e.g. specialist application
- Click on the green Save button
The new process is now displayed in the list of processes:
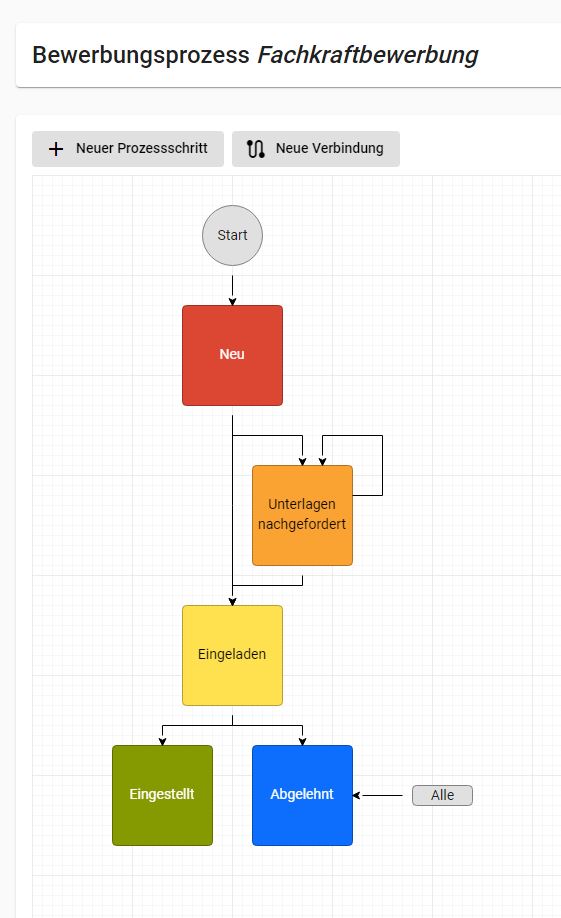
To edit the process, click on the “Configure” gearwheel button. This opens the process generator and displays the current process visually.
The illustration shows the following process:
- An incoming application (Start) is assigned the status New
- After New, either the status Invited or Documents requested can be selected
- You can switch from Documents requested to Invited status
- You can switch from Invited to Set or Rejected status
- All statuses can be changed to Rejected due to the All label next to the status
Important: There is currently no automation in the process. This means that no confirmation of receipt or other communication will be sent.
To create an initial automation in the process, define the sending of an e-mail confirmation of receipt when a new application is entered in the system.
Proceed as follows:
- Move the mouse over the New status. Three dots appear at the top right-hand edge of the status box .
- Click on the points and then in the Configure menu
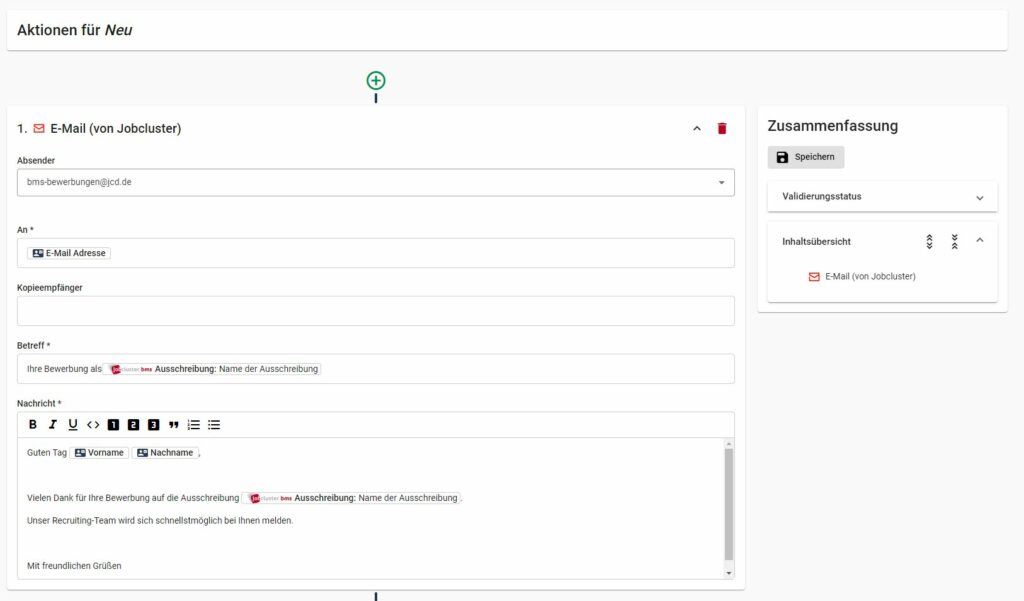
In the next step, you will see the action sequence that does not yet have any actions. To add an e-mail as an action, do the following:
- Click on the green plus
- In the Add action menu, click on E-mail (from Jobcluster)
- The action is now added to the sequence, click on the action to open it
- Enter the sender address from which the confirmation of receipt will be sent
- Enter the recipient address (To). Please use the variable from the application form:
- Click in the To field
- Under the item Add variable parameters, select the application form and then E-mail address
- Optional: Select a copy recipient e-mail
- Select the subject of the e-mail, e.g. “Thank you for your application” or you can optionally use the name of the job advertisement. Select this as a variable (see step 3.2.2.) under Process, then Tender
- Define the text of the e-mail, e.g. as in the screenshot below. Here you can also use the same method as in 3.2.2. to access the variables.
- Optional: Add further emails or other actions to the status.
- Click the Save button on the right-hand side. This saves all actions on the process.
They have implemented the following things in this section:
- A new application process linked to an application form
- Configured a process status (New) with an automatic action (e-mail).
The final step is to link a job advertisement from the One-Click-Recruiter to the applicant management system.
Link a job advertisement from the One-Click-Recruiter with the applicant management system #
To be able to manage applications in the future, you must configure job advertisements from the One-Click-Recruiter so that they are synchronized as an advertisement in the applicant management system.
Use the app menu at the top right next to your user name to switch to the One-Click-Recruiter

In the One-Click-Recruiter, select the Ads navigation item on the right-hand side and open the ads overview. Then edit an unpublished ad or copy a published ad. To edit the ad afterwards, click on the pencil button of the (copied) ad.
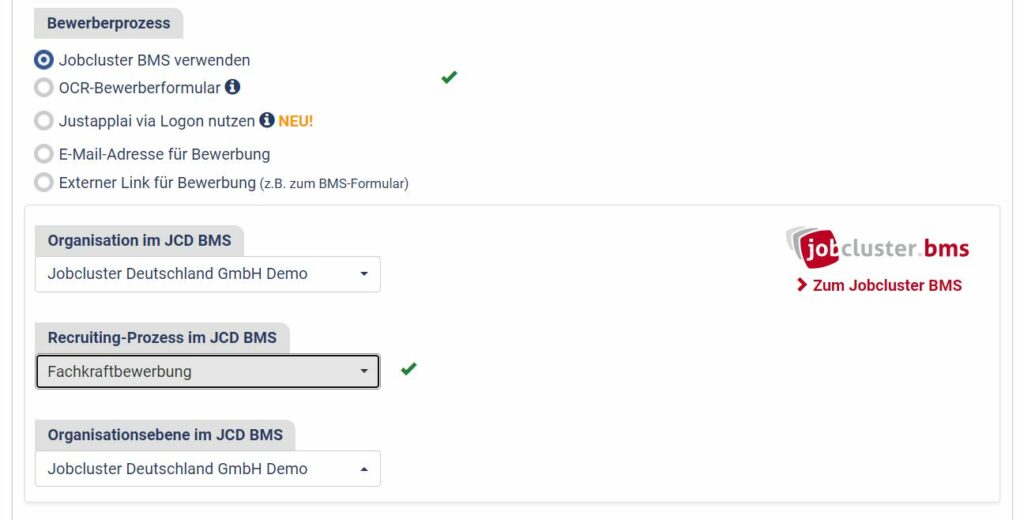
The next step is to link the job advertisement to the applicant management job cluster:
- In the Applicant process section, select Use job cluster BMS
- Your organization is preselected
- Select the relevant application process for the position, e.g. Specialist application
- The relevant organizational level in which the application is classified is preselected
- Click on the green Save job ad button at the bottom of the page
By saving the advertisement, it is transferred to the job advertisements in applicant management. In the ad overview of the One-Click-Recruiter, click on the small file folder icon next to the ad you have just linked.
The linked advertisement is now listed in the job advertisements of the applicant management system.
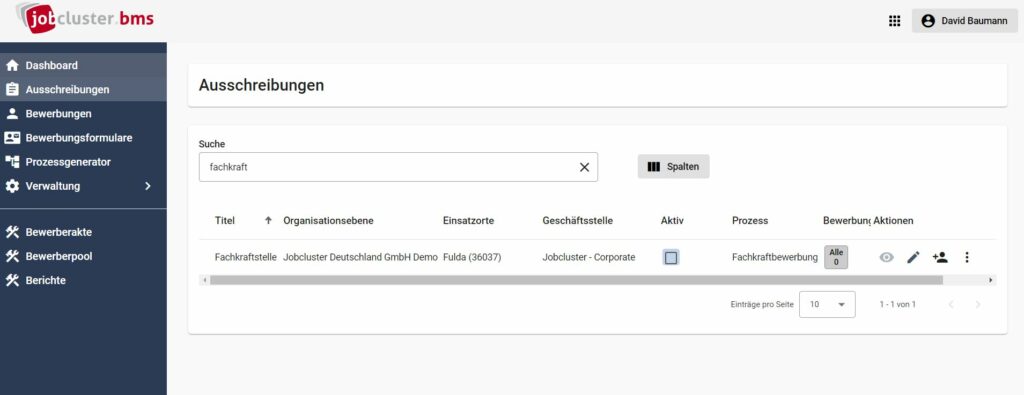
You’ve done it! With these steps, you can now manage all the applications you receive for this position in Applicant Management. You can try it out for yourself by clicking on the person icon and filling in the associated application form yourself. If you enter your own e-mail, you will receive a confirmation of receipt as defined in section 2 and you will see a new application in the overview.


